My first CDK experience under the hood
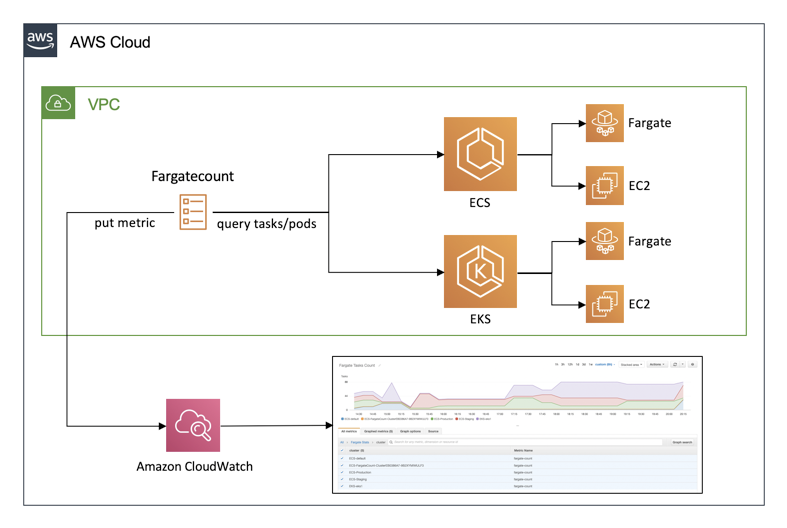
A few weeks ago I have published an AWS Fargate related project in GitHub called Fargatecount. I won’t bore you with the details of what it does (you can read it on the repository). In a nutshell, it runs a container as a scheduled Fargate task that in turn runs a script that queries ECS and EKS to collect the number of total Fargate tasks running in the account in that region and pushes a metric to CloudWatch. This is an architectural view of Fargatecount:
As I was building it, I thought I’d use it as a basis for stretching my knowledge on something I haven’t been able to use so far: the AWS Cloud Development Kit (AWS CDK for short). Using the CDK own description: the AWS Cloud Development Kit (AWS CDK) is an open source software development framework to model and provision your cloud application resources using familiar programming languages.
Usually I would have used AWS CloudFormation to package this project for automated deployments but this time I decided to learn something new. Because CDK allows to use “familiar” programming languages a lot of the documentation and tutorials available assumes that you are yourself “familiar” with these tools. What if you are not? What if you are not coming from a “developer” background?
For those that intend to learn CDK a good starting point is the self-service CDK workshop that you can find at this link. I highly recommend you to go through the workshop if you are new to the CDK.
I am putting together this blog post to walk the Typescript uninitiated on how to start with a brand new CDK project. This blog post itself is similar to the Typescript sub-workshop and it is just intended to add a few additional hints and explanation on top of that (in addition to a touch of a real-life example).
Starting point and getting ready
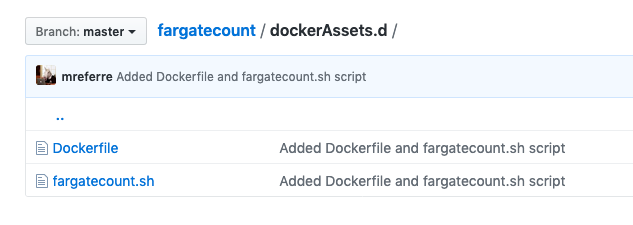
To start, I have created a repository on GitHub ( mreferre/fargatecount ) where I pushed the main application (the script I was alluding to) and its Dockerfile:
As I was exploring the possibility, I noted that this example was exactly the CDK application I was looking for to run a scheduled Fargate task. Actually this example is even more sophisticated than what I needed because it also includes the option to schedule the task with a Lambda. I didn’t need that.
At this point I had a couple of choices:
- copy Pahud ’s CDK directory and tweak the main
cdk.tsandcdk-stack.tsfiles to satisfy my needs cdk inita brand new Typescript CDK application and tweak the whole boiler plate vanilla project from the beginning
It goes without saying I went for the latter option because it let me understand what I was doing with CDK instead of mechanically tweaking a couple of files of an existing application. Of course I have done so while being inspired by Pahud’s work (which is a more professional way to say there was a lot of copy/paste involved).
What follows are the steps I have used to setup my environment. First and foremost I am working off of an AWS Cloud9 IDE. For the most part it would work similarly if you were using your laptop.
The first thing I have done was to clone my initial repository. At this point the repository only has the script and the Dockerfile as suggested above.
1max:~/environment $ git clone git@github.com:mreferre/fargatecount.git
If you are familiar with Typescript (a requirement to publish CDK libraries) you may already have the NodeJS framework running on your development environment. If not, you need to setup Node first and then install the CDK. To make my life easier I have created a container called eksutils. It includes all of the CDK code and pre-requisites (along with a lot of other AWS client side utilities). Feel free to use it as you see fit.
You can start eksutils with this command in another terminal:
1max:~/environment $ docker run -it --rm --network host -v $HOME/.aws:/root/.aws -v $HOME/.kube:/root/.kube -v $HOME/environment:/environment -v /var/run/docker.sock:/var/run/docker.sock mreferre/eksutils:latest
2sh-4.2#
If you want to have more information about the flags that are being used refer to the README in the eksutils repository.
For this application I used CDK 1.21.1 to build this version of eksutils. To find the latest release of CDK, follow this page.
1sh-4.2# cdk ——version
21.21.1 (build 842cc5f)
Note that I update the utility regularly so its latest version may be including newer releases. This should not be a problem.
As far as credentials go, I am using an IAM role assigned to the Cloud9 environment. While the AWS CLI works like a charm with this setup, the CDK is works differently (see this GitHub issue for background). The TL/DR version of it is that the CDK leverages the Node SDK which only reads from the credentials file (or the system variables). You can use the combination that best fits your need but this is what works for me from within the eksutils shell:
1sh-4.2# export AWS_ACCESS_KEY_ID=xxxxxxxxxxxxxxxxxx
2sh-4.2# export AWS_SECRET_ACCESS_KEY=xxxxxxxxxxxxxxxxx
3sh-4.2# cat /root/.aws/credentials
4[default]
5region = us-west-2
You are now ready to start your engines.
Building the CDK application
Now we are ready to initialize our CDK application. To do so, I am doing this:
- I am moving into the repository directory
- I am creating a
cdkdirectory (the directory that will contain all the CDK deployment mechanics) - I will
cdk inita typescript application
This is the sequence in the shell:
 1sh-4.2# cd environment/fargatecount/
 2sh-4.2# mkdir cdk
 3sh-4.2# cd cdk
 4sh-4.2# ls
 5sh-4.2# cdk init --language typescript
 6Applying project template app for typescript
 7Executing npm install...
 8npm WARN deprecated core-js@2.6.11: core-js@<3 is no longer maintained and not recommended for usage due to the number of issues. Please, upgrade your dependencies to the actual version of core-js@3.
 9npm WARN deprecated left-pad@1.3.0: use String.prototype.padStart()
10npm notice created a lockfile as package-lock.json. You should commit this file.
11npm WARN cdk@0.1.0 No repository field.
12npm WARN cdk@0.1.0 No license field.
13npm WARN optional SKIPPING OPTIONAL DEPENDENCY: fsevents@1.2.11 (node_modules/fsevents):
14npm WARN notsup SKIPPING OPTIONAL DEPENDENCY: Unsupported platform for fsevents@1.2.11: wanted {"os":"darwin","arch":"any"} (current: {"os":"linux","arch":"x64"})
15
16# Welcome to your CDK TypeScript project!
17
18This is a blank project for TypeScript development with CDK.
19
20The `cdk.json` file tells the CDK Toolkit how to execute your app.
21
22## Useful commands
23
24* `npm run build`   compile typescript to js
25* `npm run watch`   watch for changes and compile
26* `npm run test`    perform the jest unit tests
27* `cdk deploy`      deploy this stack to your default AWS account/region
28* `cdk diff`        compare deployed stack with current state
29* `cdk synth`       emits the synthesized CloudFormation template
30
31sh-4.2#
There is a good explanation of the major files cdk init has created in the cdk directory on the CDK workshop here. I highly recommend you to read it to become more familiar with the boiler plate being created. Note that cdk init can only be run from within an empty directory.
This is the entire list of files that I have had to change to be able to author my CDK application starting from the scaffolding cdk init has just created into my working CDK deployment. The . represent the cdk directory:
./bin/cdk.ts
This is the main application. The entry point. This is where my copy/paste/tweak from Pahud’s repository started.
./lib/cdk-stack.ts
This is the actual application. The cdk.ts file references this library when it initializes and this library has the entire logic. This is where my copy/paste/tweak from Pahud’s repository continued. This is also where I have cleaned Pahud’s logic to offer the Lambda scheduling as an alternative. This is where I have also removed all of the Amazon Simple Queue Service (SQS) sample references Pahud had in his repository.
./package.json
In this file you need to list all of the node modules (what the node ecosystem calls packages/libraries/dependencies), including specific CDK libraries, you are going to leverage in your application. There is no magic here. You need to add these manually and you need to add them all otherwise it will complain when you install this app (later). This is also where you start narrowing down the volatility of the modules versions to create consistent compiles. For example here you can say that you need a minimum version for a given module.
./.gitignore
This file will tell git which files to ignore when committing into the repository. For background, the npm install (more on this later) will download half of the internet to fetch the proper modules on the workstation you are using. They will end up in the directory ./node_modules and it is important that they are “git ignored” because they are a, basically, a deployment artifact and not part of the source code. Fortunately the cdk init scaffolding already includes most of the necessary files to exclude (including all compiled Javascript etc). Similarly, Typescript is compiled into standard JavaScript code which is the reason for which CDK by default ignores all JS files: they can easily be re-compiled starting from the source Typescript code. This is the default content of the ./.gitignore file:
1*.js
2!jest.config.js
3*.d.ts
4node_modules
5
6# CDK asset staging directory
7.cdk.staging
8cdk.out
One file you may consider adding to this list is cdk.context.json . This file is generated at install time and contains information about your AWS such as your account ID, the VPC layout etc. Depending on how sensitive these information are to you and depending on who has access to the repository you are using to check in the CDK code you may consider adding cdk.context.json to the list of file to “git ignore”. This GitHub issue has more information about this topic.
./packagelock.json
You don’t get to edit this file manually; it’s modified and managed by the npm nstall process. However, you need to make sure you check it in into your repository. As we alluded before, the package.json lists all modules you need for your application but it doesn’t force (or at least it doesn’t require to force) specific modules versions. It often only hints about minimum versions required. However, if you are not prescriptive enough, there is a high chance that future installs will lead to different versions being fetched. It’s like pulling a docker image without a tag, you always get latest and you may get different behaviours. The packagelock.json file solves for this problem because it tracks exactly the modules versions the install fetched and, a year from now, people grabbing this repository and trying to install the application will continue to install prescriptively the modules versions that have been originally tested. This is why it is important that this gets pushed to the GitHub repository for others to use when they install the CDK application.
Running the CDK application
After changing the files above (with the exception of the ./packagelock.json because that is a managed file) we are ready to install and run the application. The file ./package.json was edited to include additional modules that my application requires and that are not in the original cdk init scaffolding. We need a way to fetch these files and install the bits physically on the development environment you are using (the Cloud9 IDE in my case). These modules will land in the ./node_modules directory.
npm install is what will trigger this fetching:
 1sh-4.2# pwd
 2/environment/fargatecount/cdk
 3sh-4.2# npm install
 4npm WARN cdk@0.1.0 No repository field.
 5npm WARN cdk@0.1.0 No license field.
 6npm WARN optional SKIPPING OPTIONAL DEPENDENCY: fsevents@1.2.11 (node_modules/fsevents):
 7npm WARN notsup SKIPPING OPTIONAL DEPENDENCY: Unsupported platform for fsevents@1.2.11: wanted {"os":"darwin","arch":"any"} (current: {"os":"linux","arch":"x64"})
 8
 9added 45 packages from 6 contributors and audited 903663 packages in 7.934s
10found 0 vulnerabilities
11
12sh-4.2#
Now we have all the bits in place and we can move to the next steps.
From here we have a number of alternatives. For example, I can inspect the CloudFormation template this CDK Typescript code generates by simply launching a cdk synth in the application directory.
Note: up until recently, before launching cdk synth (or cdk deploy for that matter) you had to compile the Typescript code using npm run build. This is no longer required as the CDK will take care of that for you. Yet one of the best practices when authoring Typescript code would be to run live npm run watch in a separate shell of your IDE and monitor live the error messages as suggested in this step of the CDK workshop (if you do so mind that, at the time of this writing, the repository contains a CDK ./test directory that contains unmodified boiler plate test files that generates warning and errors because they are referring to apps and functions that do not exist).
More interestingly, what you could do now is a cdk deploy. This not only will it generate the CFN template, but it will also actually launch it. Please note that if this is the first time you use the CDK from this particular AWS account and in this particular region you may need to “bootstrap the environment”. In CDK parlance this means that CDK needs to create an S3 bucket that it’s going to use as a temporary repository for its own mechanics. Bootstrapping is a mechanism for storing assets that CDK needs to upload on your behalf (e.g. Lambda function code, docker images, etc…).
You bootstrap CDK with this command:
1cdk bootstrap aws://<AWS Account ID>/<region>
This is how it looked like running cdk bootstrap in my account (redacted in the output below) from the us-west-2 region:
1sh-4.2# cdk bootstrap aws://11111111111/us-west-2
2Bootstrapping environment aws://11111111111/us-west-2...
3CDKToolkit: creating CloudFormation changeset...
40/2 | 10:50:30 | CREATE_IN_PROGRESS | AWS::S3::Bucket | StagingBucket
50/2 | 10:50:31 | CREATE_IN_PROGRESS | AWS::S3::Bucket | StagingBucket Resource creation Initiated
61/2 | 10:50:53 | CREATE_COMPLETE | AWS::S3::Bucket | StagingBucket
72/2 | 10:50:55 | CREATE_COMPLETE | AWS::CloudFormation::Stack | CDKToolkit
8Environment aws://11111111111/us-west-2 bootstrapped.
At this point, we can deploy the Fargatecount application:
1cdk deploy --context armed=true FargateCount
Note that I could possibly omit FargateCount in the command above because FargateCount is the only stack defined in ./bin/cdk.ts. In Pahud’s case the file included multiple functions and they needed to call out explicitly. The --context flag is used to pass context information to your CDK application. These variables behave similar to CloudFormation parameters, but there are subtle differences and it’s best to not think of them as CloudFormation parameters.
Conclusions
This concludes my short post whose goal was to explain simply what happens when you create a new CDK project. If you are a CDK and/or a Node expert this post may have added very little to what you know. If you are someone coming from a non developer background I hope this blog has shed some lights on some of the arcane mechanics of CDK and Node.