AWS Identity and Access Management: Introduction to Resources Access Control
This is my first blog post as an AWS employee. I have spent the last 6+ months learning new things (IAM being one of them) and I figured I could (and should) share some of these learnings with my followers. I hope it can smooth the learning curve when you transition from a data center centric view of the world to a cloud centric view of the world. This blog post doesn’t add new information that can’t be found in the AWS official documentation. However, it flows in a way that makes the most sense to me. Given this is a personal preference, if you are like me, I hope you may find this useful. Let’s get started.
As you learn how user and access management work in the AWS Cloud, some concepts might be unfamiliar to you if you are new to cloud computing. I recommend that you start by learning some fundamental AWS Identity and Access Management (IAM) concepts to help you securely control access to your AWS resources. In this blog post, I walk through some of the options that AWS customers has to configure access to resources. Among the many, there are four specific use cases I will be discussing throughout the document that demonstrate the flexibility and granularity that IAM provides:
- Assigning permissions to users within an account
- Assigning permissions to applications running on EC2 within an account
- Assigning cross account permissions to users
- Assigning cross account permissions to applications running in Lambda
First things first: IAM users and groups
When you first create an AWS account, you begin with an identity that has access to all AWS services and resources in the account—this is called the root user. You access your root user by signing in with the email address and password that you used to create your account. Because the root user has unlimited privileges, you need to secure the user by enabling multi-factor authentication (MFA) and then abstain from using the root user for common tasks. I recommend you use IAM users for common tasks because you can control access to the AWS services and resources in your AWS account.
Up next: IAM policies
Before we dive into the actual use cases, we need to clear the air with an additional key component: IAM policies. With IAM, you manage permissions by attaching policies to identities (such as IAM users and through groups membership) and resources (such as AWS services). You can attach permissions policies to identities (identity-based policies) or to resources (resource-based policies). Identity-based policies describe which actions the user can perform on the resources described in the policy. Resource-based policies describe which actions can be performed on a resource by the users specified in the policy.
In this blog post, I also use trust policies, which are resource-based policies that are associated with an and that define who can assume the role. IAM roles are a mechanism to receive temporary permissions to entities in the AWS Cloud. More on this later in the document.
For more information about IAM policies, see IAM Policies, which includes an overview of the JSON policy syntax (policies are written in JSON). Understanding how IAM policies are structured is important as you read the remainder of this blog post, which includes some simple IAM policy examples.
Assigning permissions to users within an account
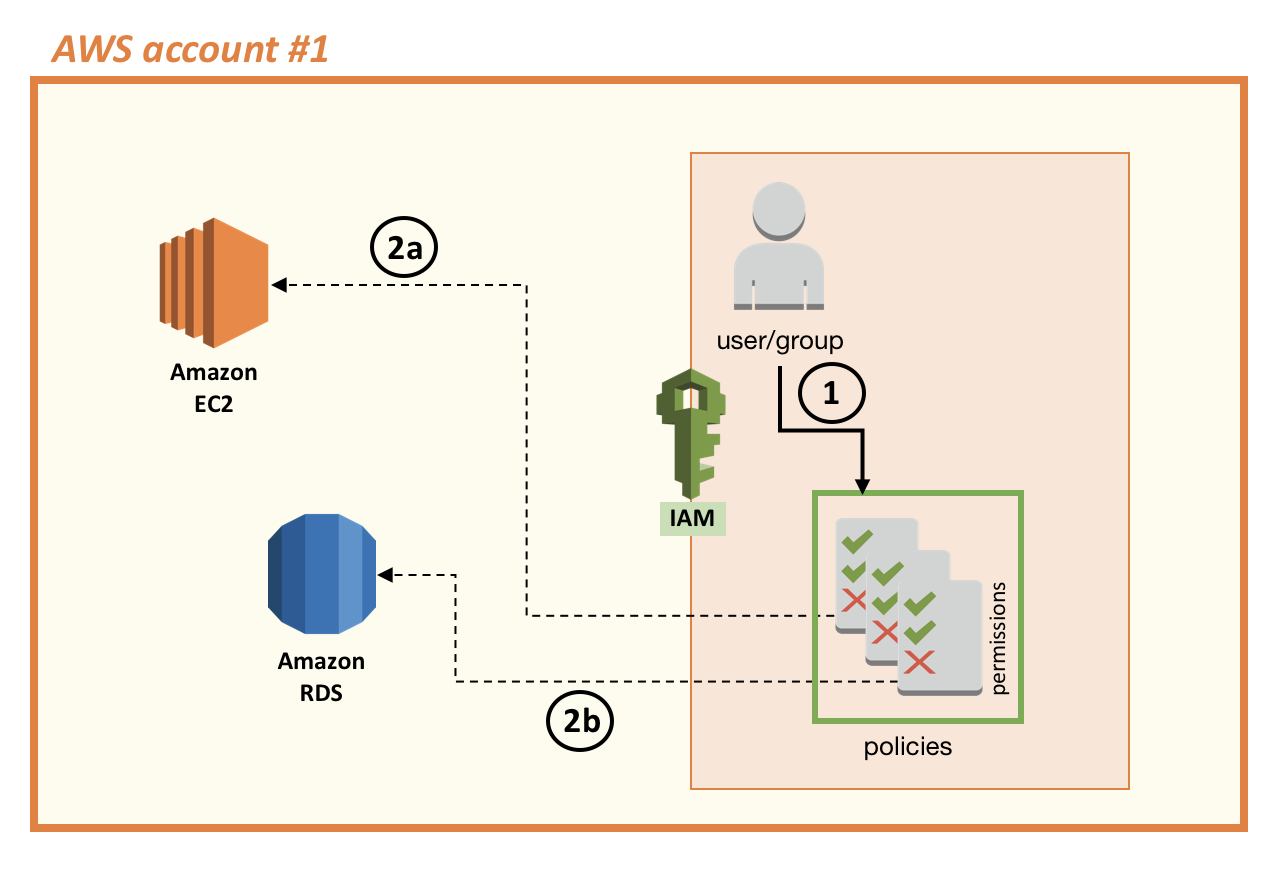
Most AWS customers get started with IAM by creating users from their root account and associating permissions policies. You also can put users in IAM groups (an IAM best practice) and associate policies with groups instead of individual users. If you associate IAM policies with groups, users in the groups will have the group’s permissions. If you remove a user from a group, the user no longer has the permissions associated with that group. If you don’t use groups, you must manage permission to users individually. This can create more administrative work and introduces the possibility of misconfiguring permissions.
In the following diagram, a user (1) has been granted permissions to work with Amazon EC2 instances (2a) and Amazon RDS databases (2b). The user can do this work either through the AWS Management Console or by using the AWS CLI and AWS SDKs. Note that using the console requires the user to sign in using a user ID and password. However, if the user wants to interact programmatically with AWS services, the user would use an access key ID and secret access key. For every IAM user, you can decide which types of access you want to grant—console credentials, programmatic access keys, or both.
Some users use their access key ID and secret access key within their applications when accessing AWS resources. Similarly, others use credentials inside an application running on an Amazon EC2 instance that requires access to Amazon RDS or any other AWS service. These approaches can become a problem when, for example, your application breaks when you rotate keys: you don’t want to have to change the code of your application every time you change the credentials of your user because this will create a critical dependency (if you don’t change both at the same time, your application won’t have access to AWS resources). In the next section we explore how IAM can help address more properly these situations.
Assigning permissions to applications running on EC2
A best practice to allow an Amazon EC2 instance to access other AWS services is to use IAM roles. You can use an IAM role to receive temporary credentials to access another entity (such as an IAM user or an AWS service). Those entities can assume the role temporarily and gain access to the permissions assigned to the role to perform tasks.
In the case of the scenario illustrated in the preceding diagram, for the Amazon EC2 instance to be able to gain access to AWS services, your account administrator must:
- Create an IAM role for Amazon EC2 with a set of permissions associated with the role.
- Assign the role to the Amazon EC2 instance.
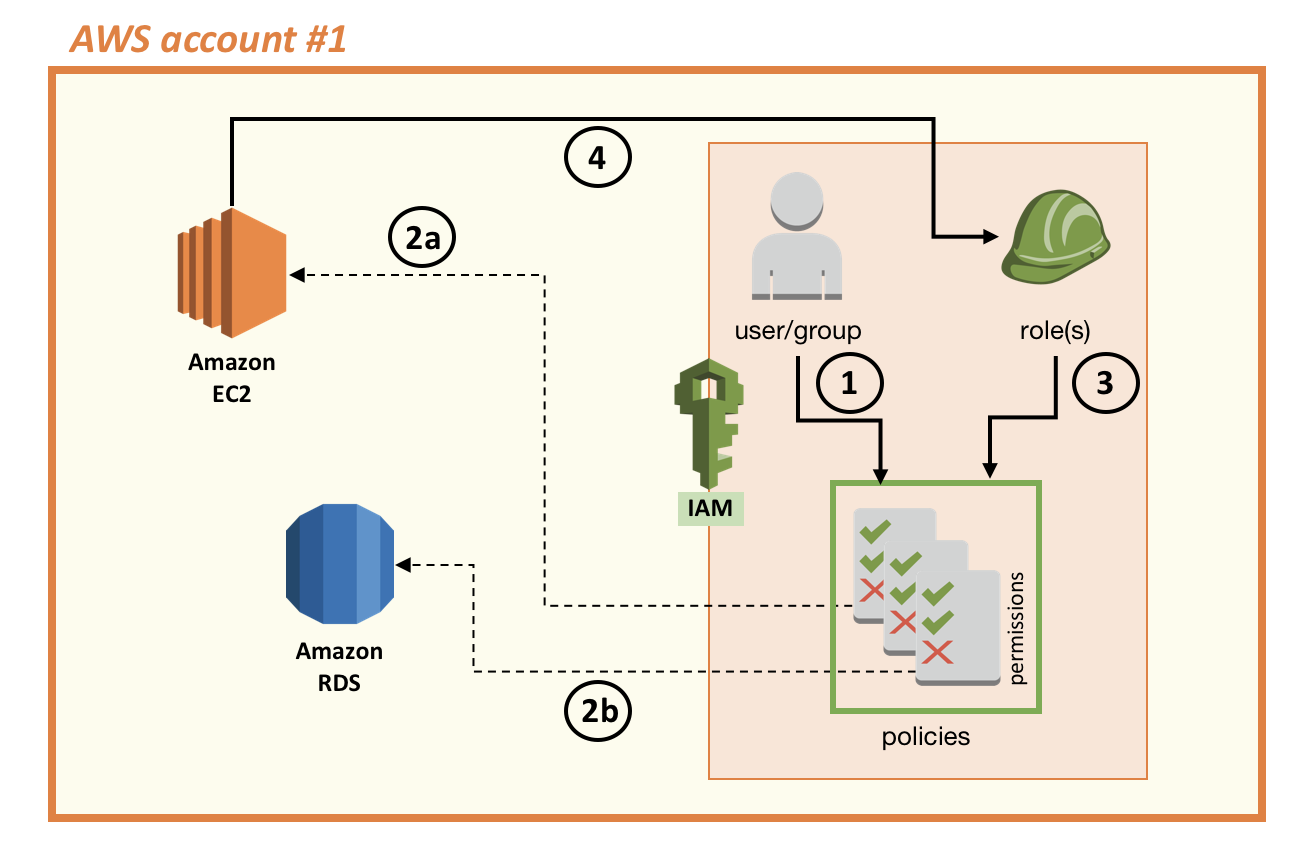
Note that when you create an IAM role, you are assigning both a trust policy (which defines the identity or the resource that is permitted to assume that role) and a permissions policy (which defines which actions the role can perform). In this scenario, the trust policy states that the EC2 service is the resource trusted to assume the IAM role we created, and the set of permissions assigned to the IAM role is AmazonRDSFullAccess (an AWS managed policy with the permissions assigned in the preceding diagram to the user or group). Assigning these permissions allows the Amazon EC2 instance to assume the role and have access to Amazon RDS (see the following diagram).
With roles for Amazon EC2, you do not need to keep long-term credentials on the instance to run an application. The Amazon EC2 instance uses the Amazon EC2 metadata service. You can query the metadata service explicitly and programmatically; however, the AWS CLI and SDK automatically retrieve the temporary key from the metadata service. Using the AWS CLI and SDK allows you to focus on writing your code logic instead of managing credentials. To learn more, see Retrieving Security Credentials from Instance Metadata.
The following diagram shows the Amazon EC2 instance assuming the IAM role (4). The role (3) allows the Amazon EC2 instance (and the code running inside the instance) to access the Amazon RDS resource (2b).
Assigning cross account permissions to users
An IAM role is useful in many other ways and enables you to rely on short-term credentials instead of long-term credentials. Many AWS customers require multi-account deployments, and IAM roles can provide cross-account access to resources. Note that some AWS services have native capabilities for cross-account access by virtue of being able to configure resource-based policies. However, not all AWS services support these capabilities and, in those cases, using roles can be helpful.
Continuing the example from the previous section, let’s say you have a user in AWS account #2 assume the role you created in AWS account #1 (see the following diagram). Doing so allows the user in the second account to access the Amazon RDS instance in the first account. To grant such access, you have to create a role in the first account to delegate permissions to an IAM user in the second account. This creates a trust (see the “Trust Policy” section on Roles Terms and Concepts for more information). By delegating a user in account #2 to assume a role that you created in account #1, you are creating a trust in which account #1 trusts account #2.
Note that after you create a role, you can edit it to modify its properties (for example, to list more than one account you want to trust). The following diagram illustrates a setup that allows a user in the second account to access resources (6) in the first account.
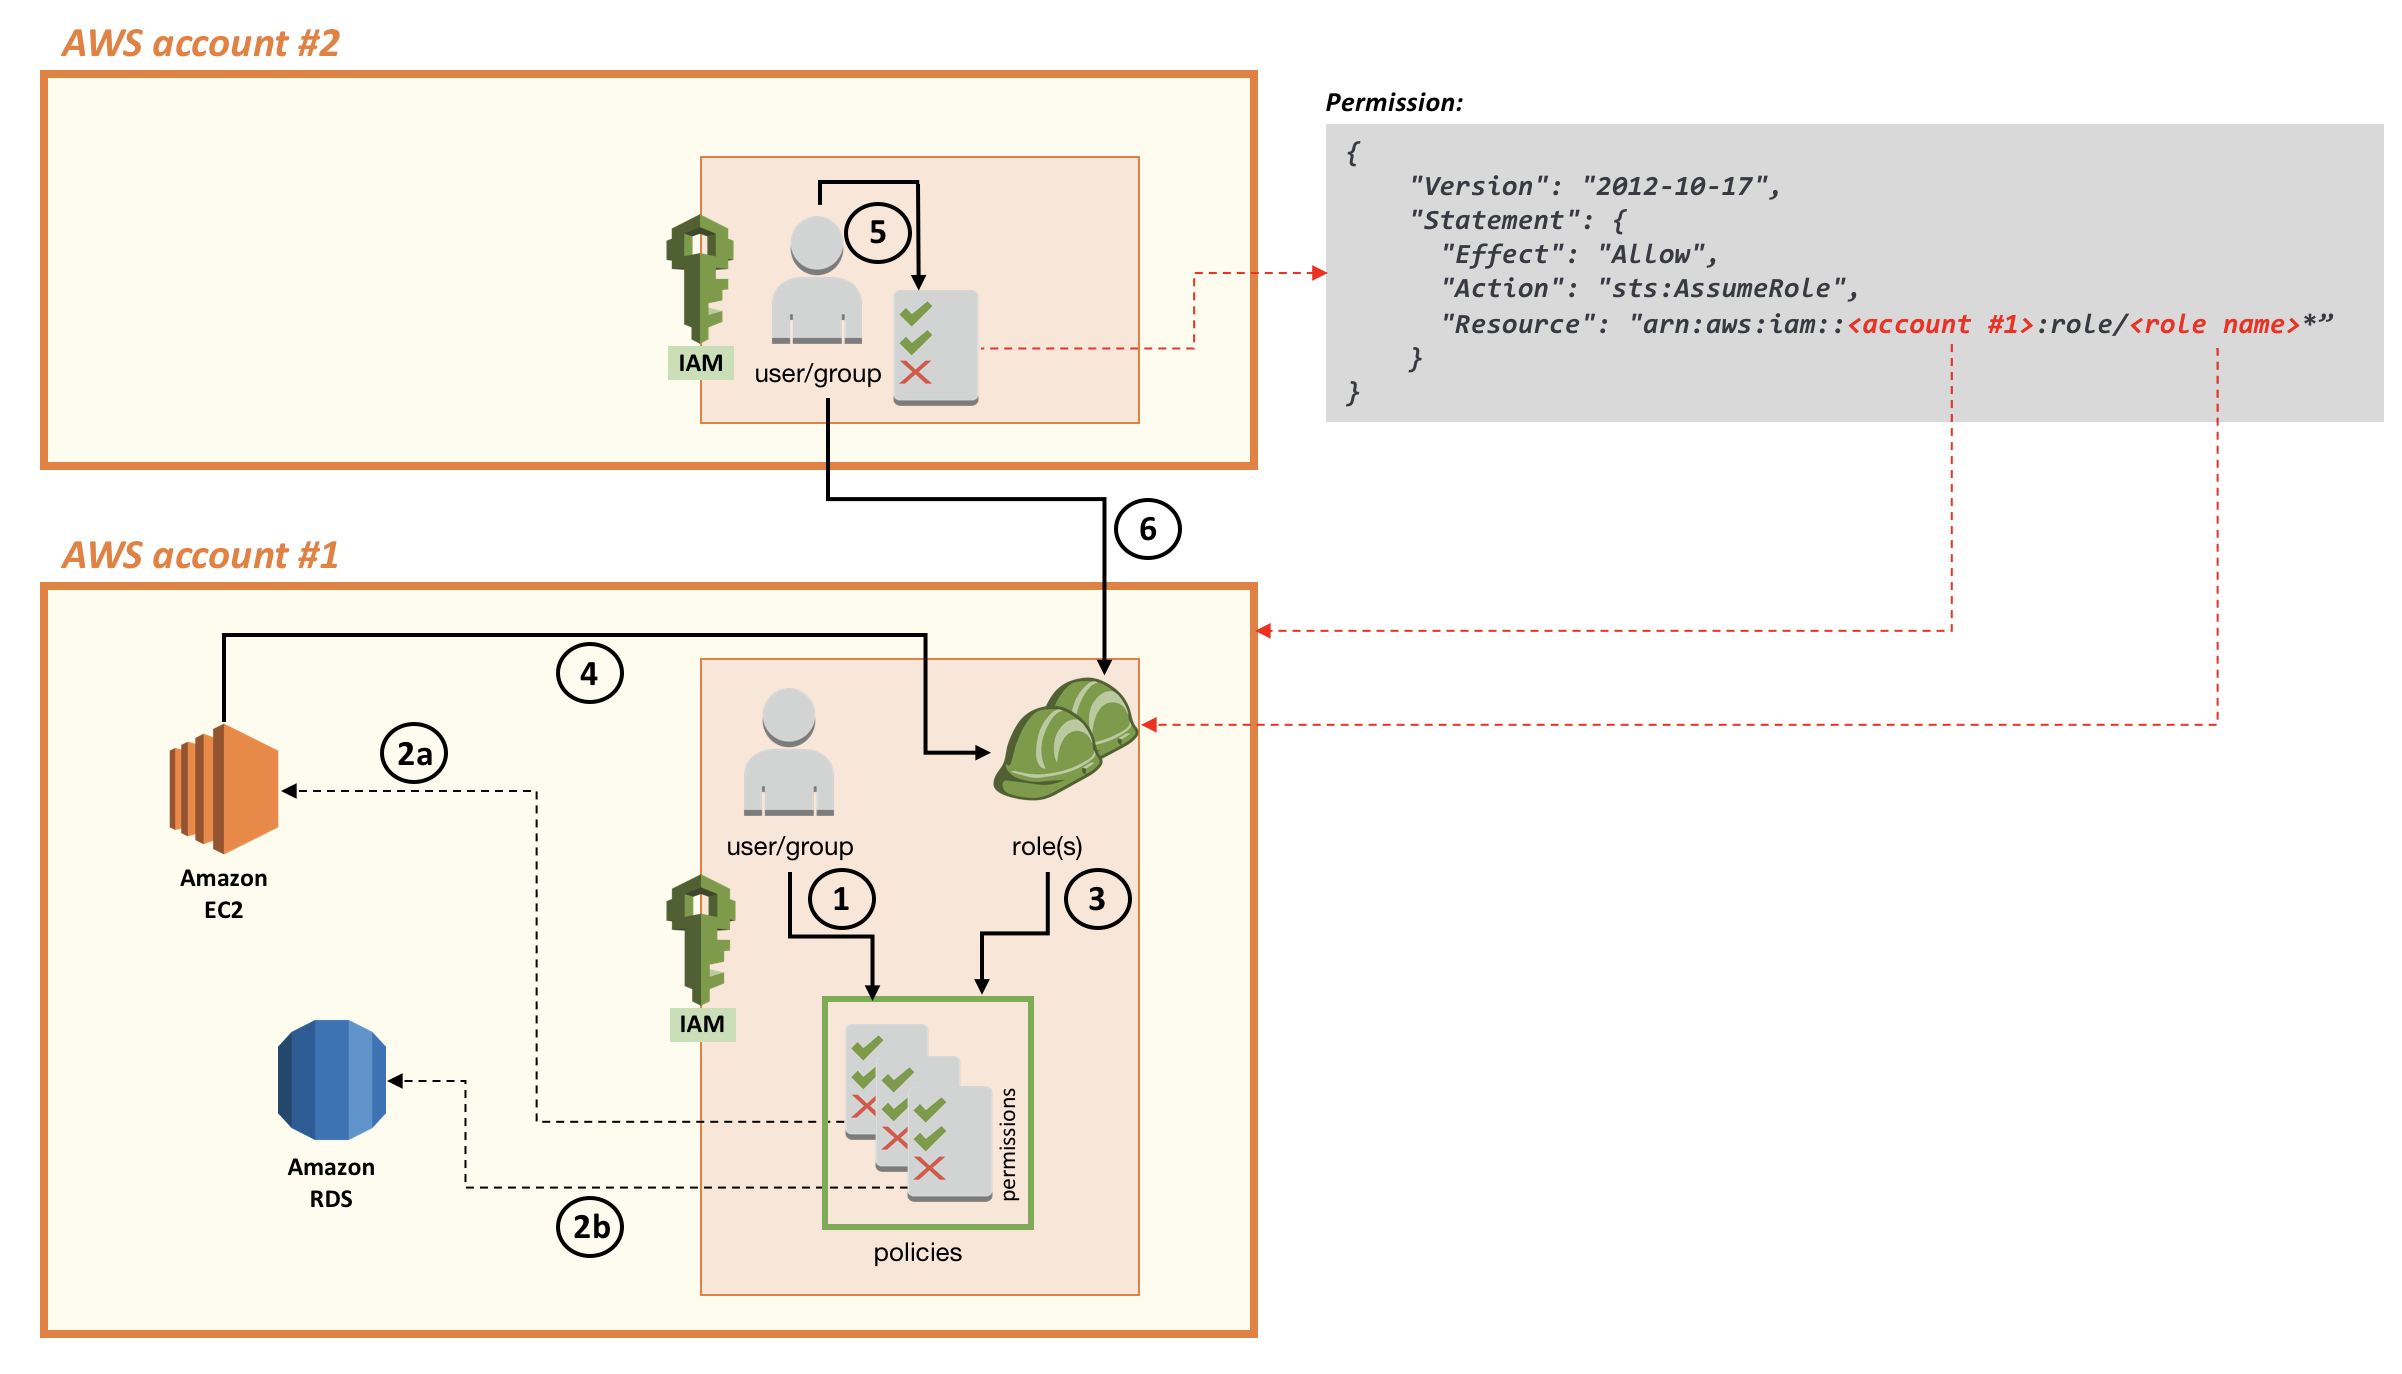
Now that you have established trust between the two accounts, an administrator in the second account can grant a user in the same account the right to assume the role in the first account. When the user has the permissions (assigned by using a permissions policy), he can assume the role created in the first account through the AWS console, through the CLI or through the APIs, to gain access to the permissions assigned to that role.
Note that the preceding diagram shows two roles (represented by two green construction hard hats) in the first account. This is because the first role has a trust relationship (as a result of the trust policy) with Amazon EC2 (meaning it’s a role that an Amazon EC2 instance can assume). The JSON policy document for the trust relationship looks like the following code example. As you can see, the Principal (the entity affected by the policy) is Amazon EC2.
 1{
 2  "Version": "2012-10-17",
 3  "Statement": [
 4    {
 5      "Effect": "Allow",
 6      "Principal": {
 7        "Service": "ec2.amazonaws.com"
 8      },
 9      "Action": "sts:AssumeRole"
10    }
11  ]
12}
The second role has a trust relationship with the second account, which means this trust enables an administrative user in the second account the ability to allow users and roles in that account to assume the role in the first account. The following code example is the policy document for this second role.
 1{
 2  "Version": "2012-10-17",
 3  "Statement": [
 4    {
 5      "Effect": "Allow",
 6      "Principal": {
 7        "AWS": "arn:aws:iam::<account #2>:<admin user>"
 8      },
 9      "Action": "sts:AssumeRole",
10      "Condition": {}
11    }
12  ]
13}
Assigning cross account permissions to applications running in Lambda
In this post, I have showed the high level concepts of how to use IAM roles to enable a resource (such as an Amazon EC2 instance) in one AWS account to consume a service (such as Amazon RDS) in the same account. I also showed how to allow a user in one AWS account to assume a role to consume a resource in another account.
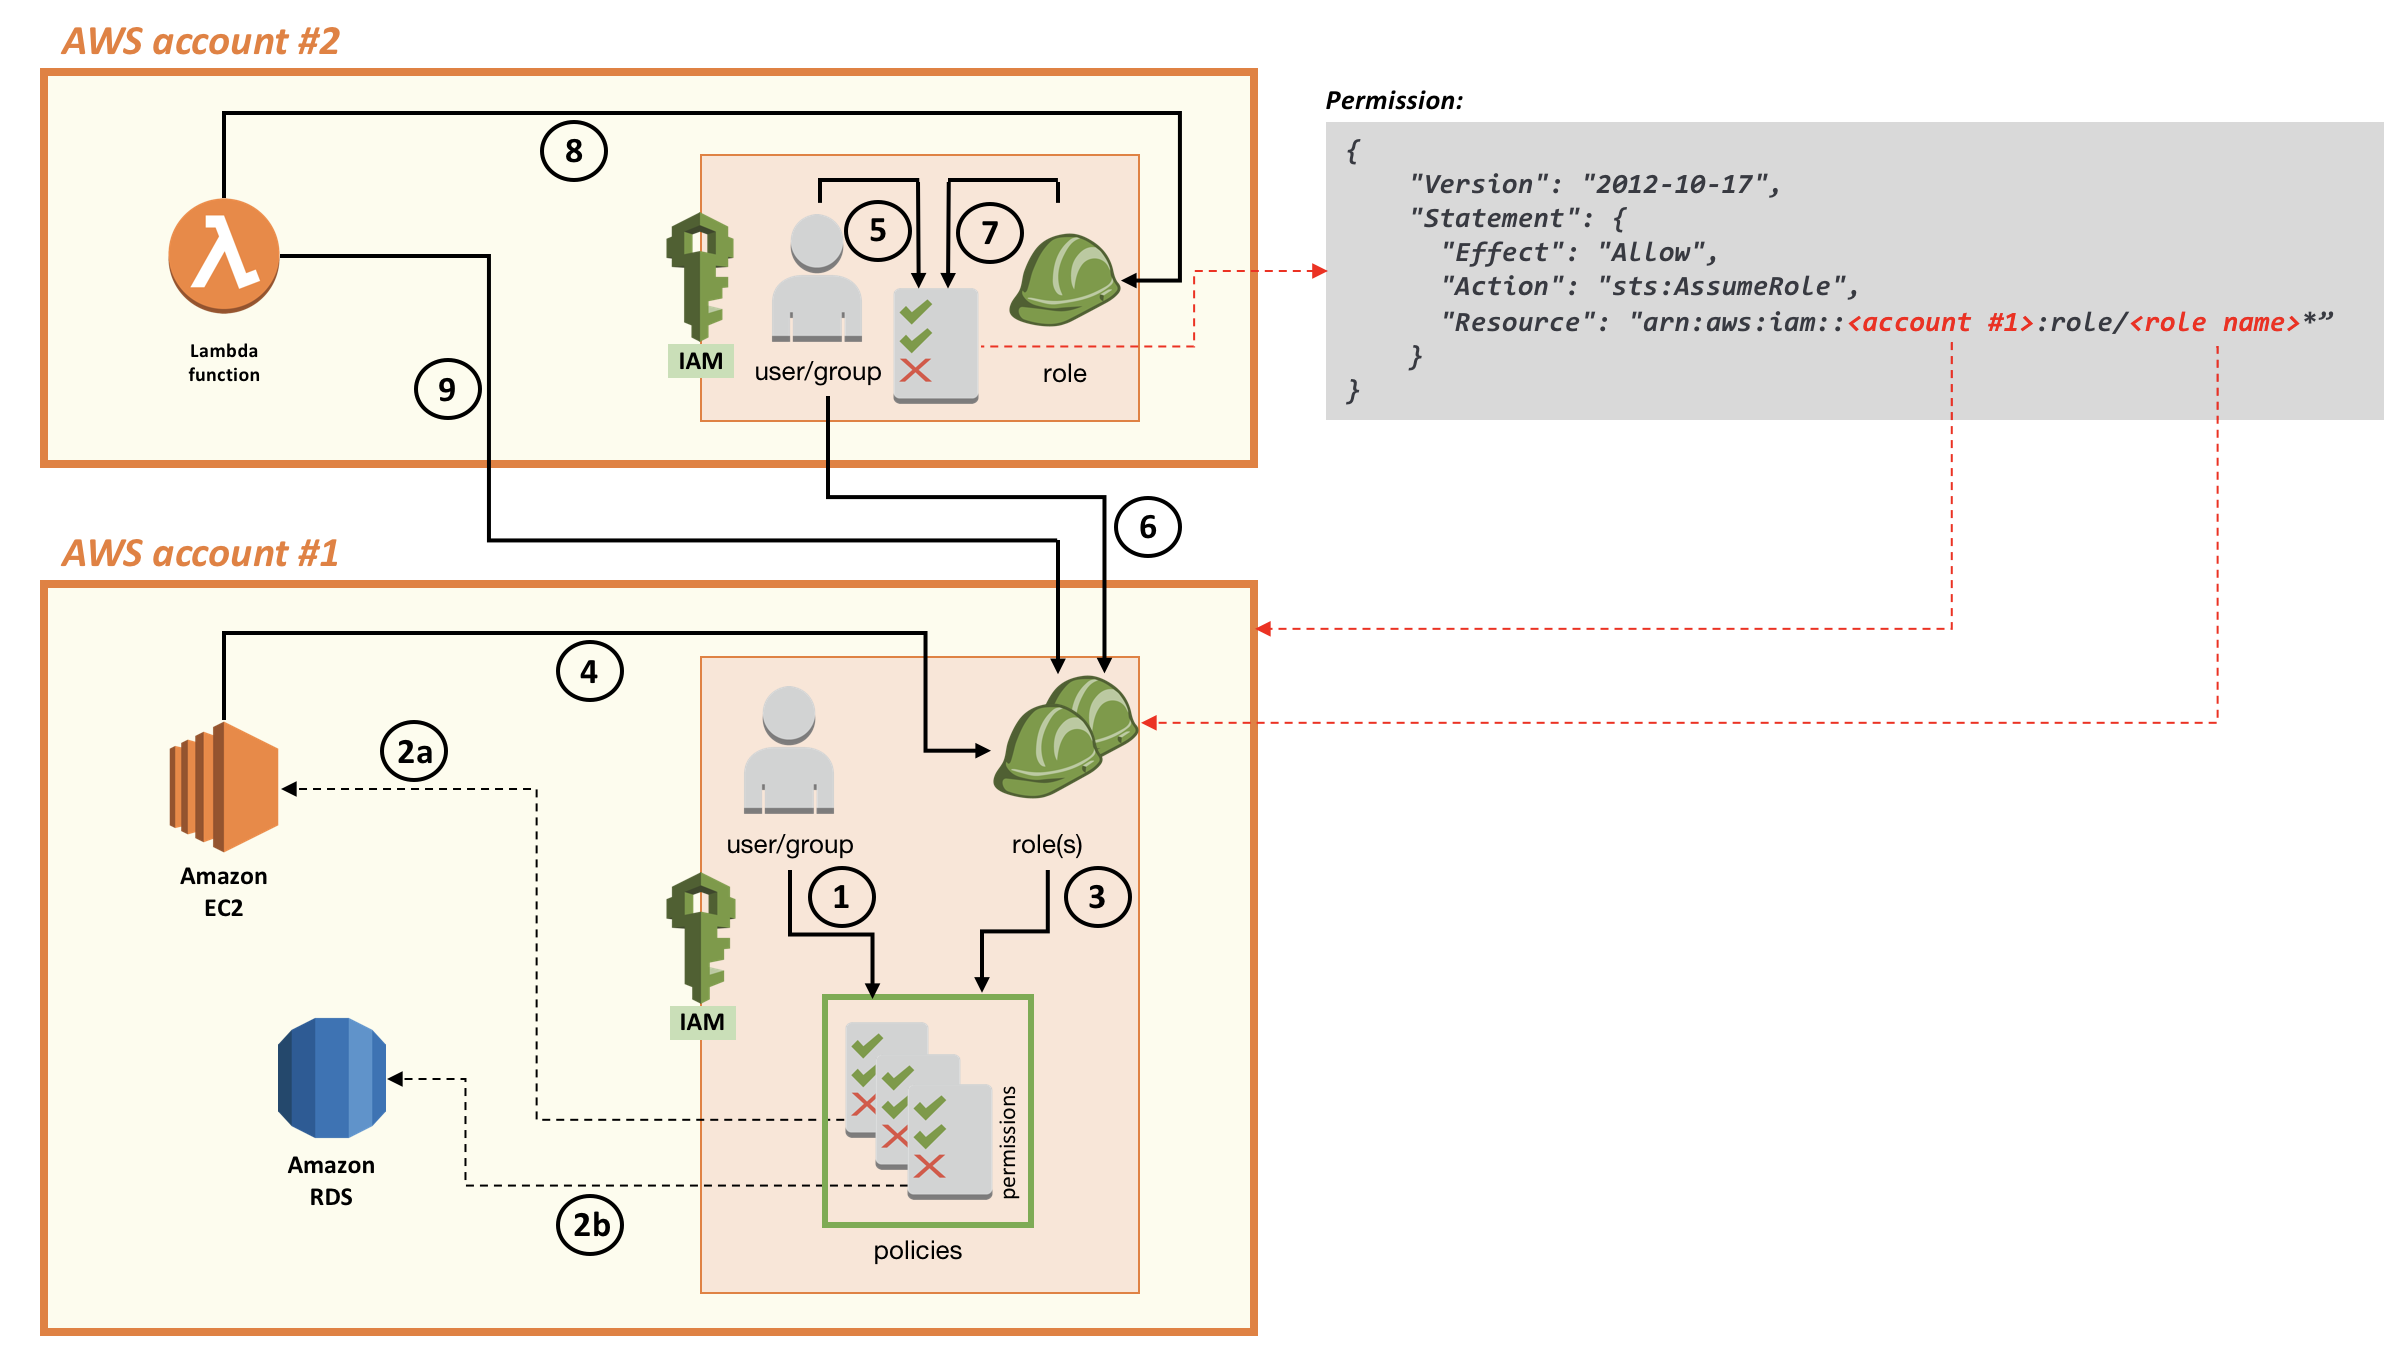
Now, I will show you how to configure a resource in one AWS account to assume a role and consume a resource in a different AWS account. For example, you can allow a Lambda function in the second AWS account to access the Amazon RDS database in the first account (see the following diagram). You can read more about Lambda here but, in essence, it’s a serverless event-driven computational model that allows you to run single application functions without requiring any host (EC2 or otherwise). The process is similar to the process that allows a user to assume a role. However, in this case, you also must create a role in the second account that will be associated with the Lambda function.
The role I create in the second account has the following trust relationship.
 1{
 2  "Version": "2012-10-17",
 3  "Statement": [
 4    {
 5      "Effect": "Allow",
 6      "Principal": {
 7        "Service": "lambda.amazonaws.com"
 8      },
 9      "Action": "sts:AssumeRole"
10    }
11  ]
12}
In the preceding code, I create a trust relationship with Lambda (so that this role can be associated with a Lambda function). The trust explicitly allows Lambda (lambda.amazonaws.com) to assume a role (sts:AssumeRole). If I were to create a role and assign it to, for example, an Amazon EC2 instance instead, the principal would have been ec2.amazonaws.com instead of lambda.amazonaws.com.
After I create this trust relationship, I need to assign it the proper permissions. The role in the second AWS account will have an inline permissions policy that explicitly allows the Lambda function to assume the role in the first account. Note that the permissions policy (edited inline in this case) should not be confused with the trust policy. This permissions policy has the same permissions that were assigned to the IAM user in the previous example. The trust relationship lets Lambda assume a role by calling the AssumeRole API, and the permissions policy assigned to the role allows Lambda to access AWS services defined in the policy.
Now, the Lambda function can explicitly request to assume the role via the AWS CLI or SDK. The function is granted by AWS Security Token Service (AWS STS) temporary credentials that carry the permissions associated with the role in the first account that the Lambda function is assuming. As shown in the following diagram, the Lambda function in AWS account #2 is associated with (8) a role in account #2 that has permissions to assume the role in account #1 (6). And the role in account #1 has permissions (3) to access Amazon RDS (2b). As a result, the Lambda function can access Amazon RDS without relying on long-term credentials such as secret and access keys.
Conclusion
In this blog post I explored some fundamental concepts of AWS IAM as they relate to assigning permissions to entities on the AWS Cloud. I explained the high level concepts of how to grant users and groups in an account permissions to access resources in the same account. I then explored how to enable resources in an account to access resources in the same account. Finally, I presented a cross-account scenario that uses IAM roles.
The scenarios in this post use some variations and different API calls to obtain temporary access to AWS resources. You can learn more about the different calls and methods by visiting Requesting Temporary Security Credentials. This documentation topic also is useful starting point to dive deeper into other access management scenarios, based on your specific needs and use cases.
If you have comments about this please, submit them in the “Comments” section below. If you have questions about how to implement the solutions in this post, start a new thread on the IAM forum.
Massimo.